SwiftUI Hierarchy Lists
 @zntfdr
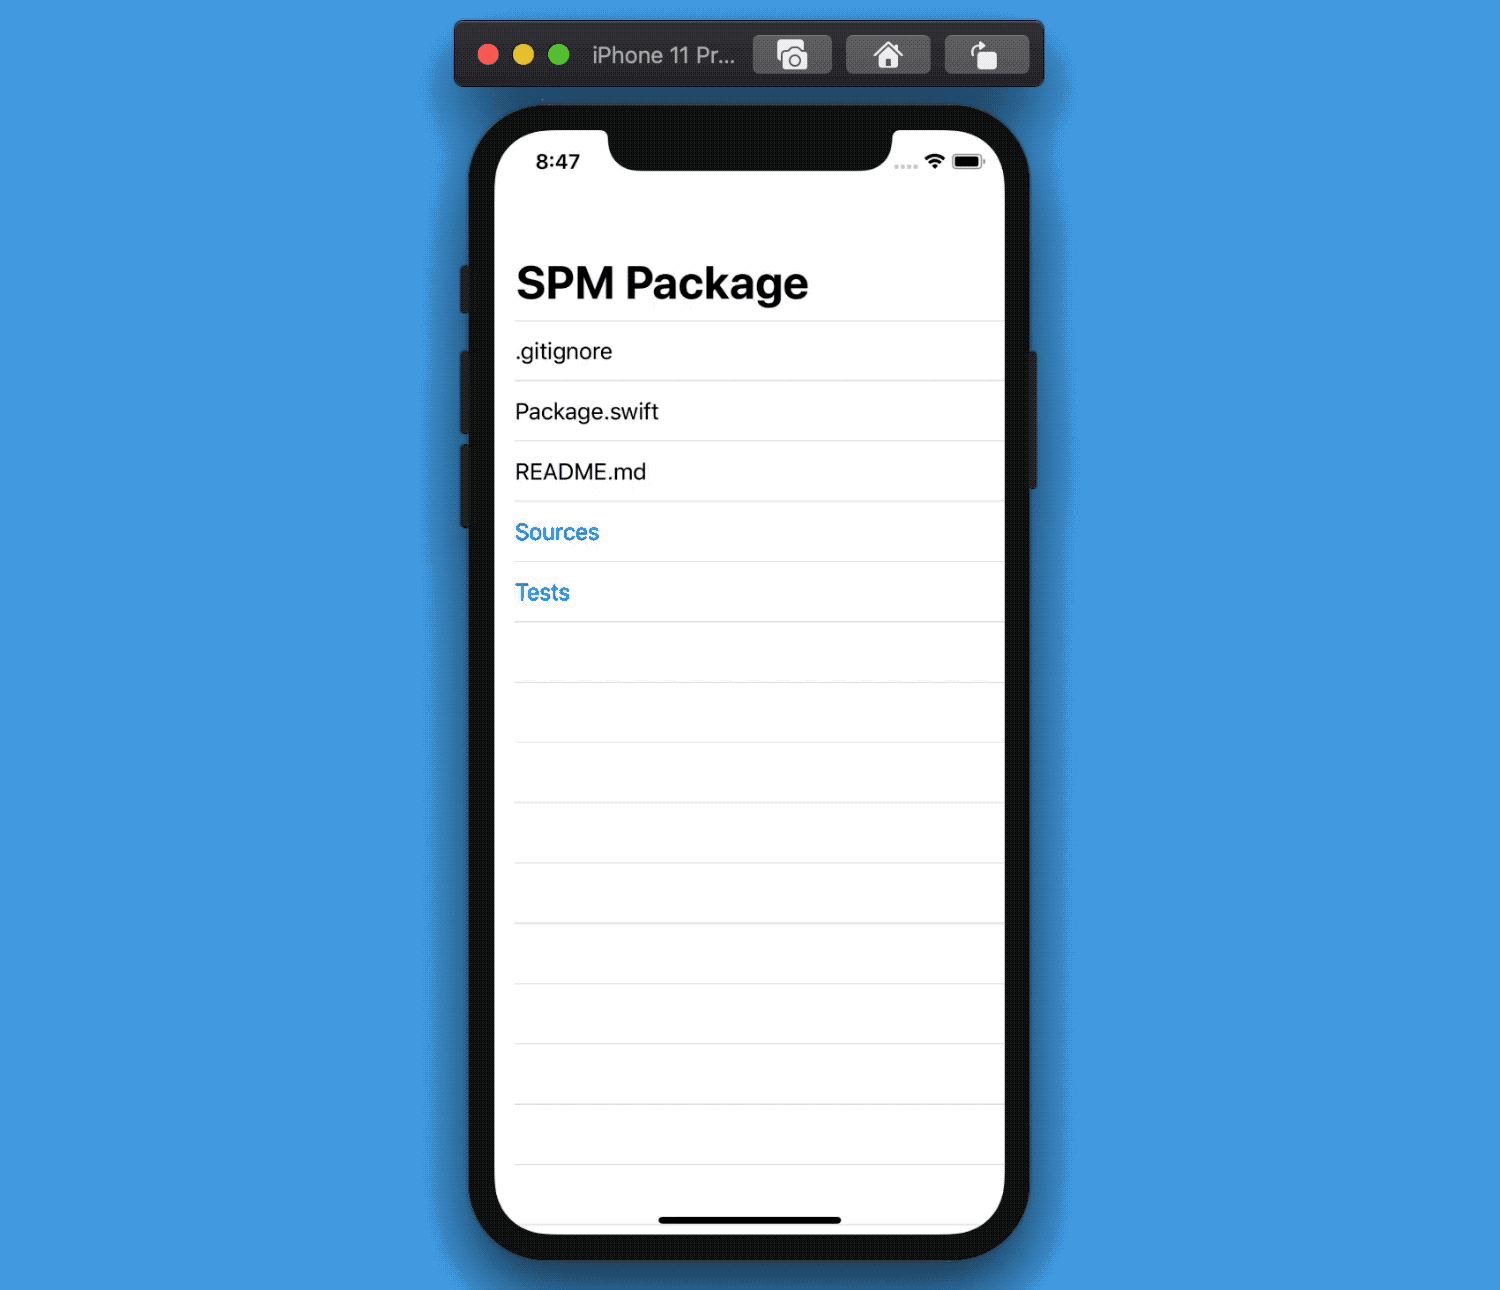
Among the SwiftUI enhancements from this year, List has learned to traverse hierarchical data.
This is useful when we'd like to display a tree-like structure, for example a Swift Package folder:

The best part? Its implementation is one line of code.
Given our recursive model:
struct FileItem: Identifiable {
  let name: String
  var children: [FileItem]? // 👈🏻

  var id: String { name }
}
This is our complete view:
struct ContentView: View {
  let data: [FileItem]

  var body: some View {
    List(data, children: \.children, rowContent: { Text($0.name) })
  }
}
This is all List needs:
- an array of elements
- a keypath to the optional children
- a view builder that, given one element, creates a row
List will take care of everything else.
This is yet another example of an elegant SwiftUI API, tucking away complexity from the developer:
let's see how we can implement our own hierarchy lists.
Implementing a Hierarchy List
We will mimic the same signature of the
Listinitializer used above.
Our new structure will be composed of two pieces:
- a simple
List, to preserve the lazy loading of our views - a
RecursiveView, that will display a given "hierarchy level" (e.g. the content of a folder)
Generic Constraints
Our Hierarchy List will support any inputs and views; therefore we will define two generics:
- the type of collection data that comes in,
Data - the output of the row view builder,
RowContent
To make it work, we need to set some limitations on these generics:
Datawill need to be aRandomAccessCollection, as ourListcan access any of its elements at willDatacollection'sElement,Data.Element, will need to conform toIdentifiable, as required byListto identify each row- Lastly, the output of the row view builder,
RowContent, must be aView
1. HierarchyList
HierarchyList is the first of the two components just mentioned above, this is the component that developers will see when using our API.
struct HierarchyList<Data, RowContent: View>: View where Data: RandomAccessCollection, Data.Element: Identifiable {
  let recursiveView: RecursiveView<Data, RowContent>

  init(
    data: Data,
    children: KeyPath<Data.Element, Data?>,
    rowContent: @escaping (Data.Element) -> RowContent
  ) {
    self.recursiveView = RecursiveView(data: data, children: children, rowContent: rowContent)
  }

  var body: some View {
    List {
      recursiveView
    }
  }
}
As promised, this is really just a List that invokes the second component of our structure: RecursiveView.
2. RecursiveView
This view will display one level of elements and, if one or more of these elements have any "sub-elements", will invoke itself via a DisclosureGroup (that we met previously).
DisclosureGroup's uses a lazy approach: it computes itscontenton demand, based on what it needs to display.
In either case, the given rowContent view builder will be used to draw each row in the screen:
struct RecursiveView<Data, RowContent: View>: View where Data: RandomAccessCollection, Data.Element: Identifiable {
  let data: Data
  let children: KeyPath<Data.Element, Data?>
  let rowContent: (Data.Element) -> RowContent

  var body: some View {
    ForEach(data) { child in
      if let subChildren = child[keyPath: children] {
        DisclosureGroup {
          RecursiveView(data: subChildren, children: children, rowContent: rowContent)
        } label: {
          rowContent(child)
        }
      } else {
        rowContent(child)
      }
    }
  }
}
Wrap up
That's it! With just 33 lines of code, we have perfectly cloned the new List hierarchical behavior:
Lastly, let's add some access control modifiers in order to complete our API:
public struct HierarchyList<Data, RowContent: View>: View where Data: RandomAccessCollection, Data.Element: Identifiable {
  private let recursiveView: RecursiveView<Data, RowContent>

  public init(
    data: Data,
    children: KeyPath<Data.Element, Data?>,
    rowContent: @escaping (Data.Element) -> RowContent
  ) {
    self.recursiveView = RecursiveView(data: data, children: children, rowContent: rowContent)
  }

  public var body: some View {
    List {
      recursiveView
    }
  }
}

private struct RecursiveView<Data, RowContent: View>: View where Data: RandomAccessCollection, Data.Element: Identifiable {
  let data: Data
  let children: KeyPath<Data.Element, Data?>
  let rowContent: (Data.Element) -> RowContent

  var body: some View {
    ForEach(data) { child in
      if let subChildren = child[keyPath: children] {
        DisclosureGroup {
          RecursiveView(data: subChildren, children: children, rowContent: rowContent)
        } label: {
          rowContent(child)
        }
      } else {
        rowContent(child)
      }
    }
  }
}
The final gist can be found here.
A Custom Hierarchy List Behavior
Since we have built our Hierarchy List, we can now add behaviors that SwiftUI doesn't offer.
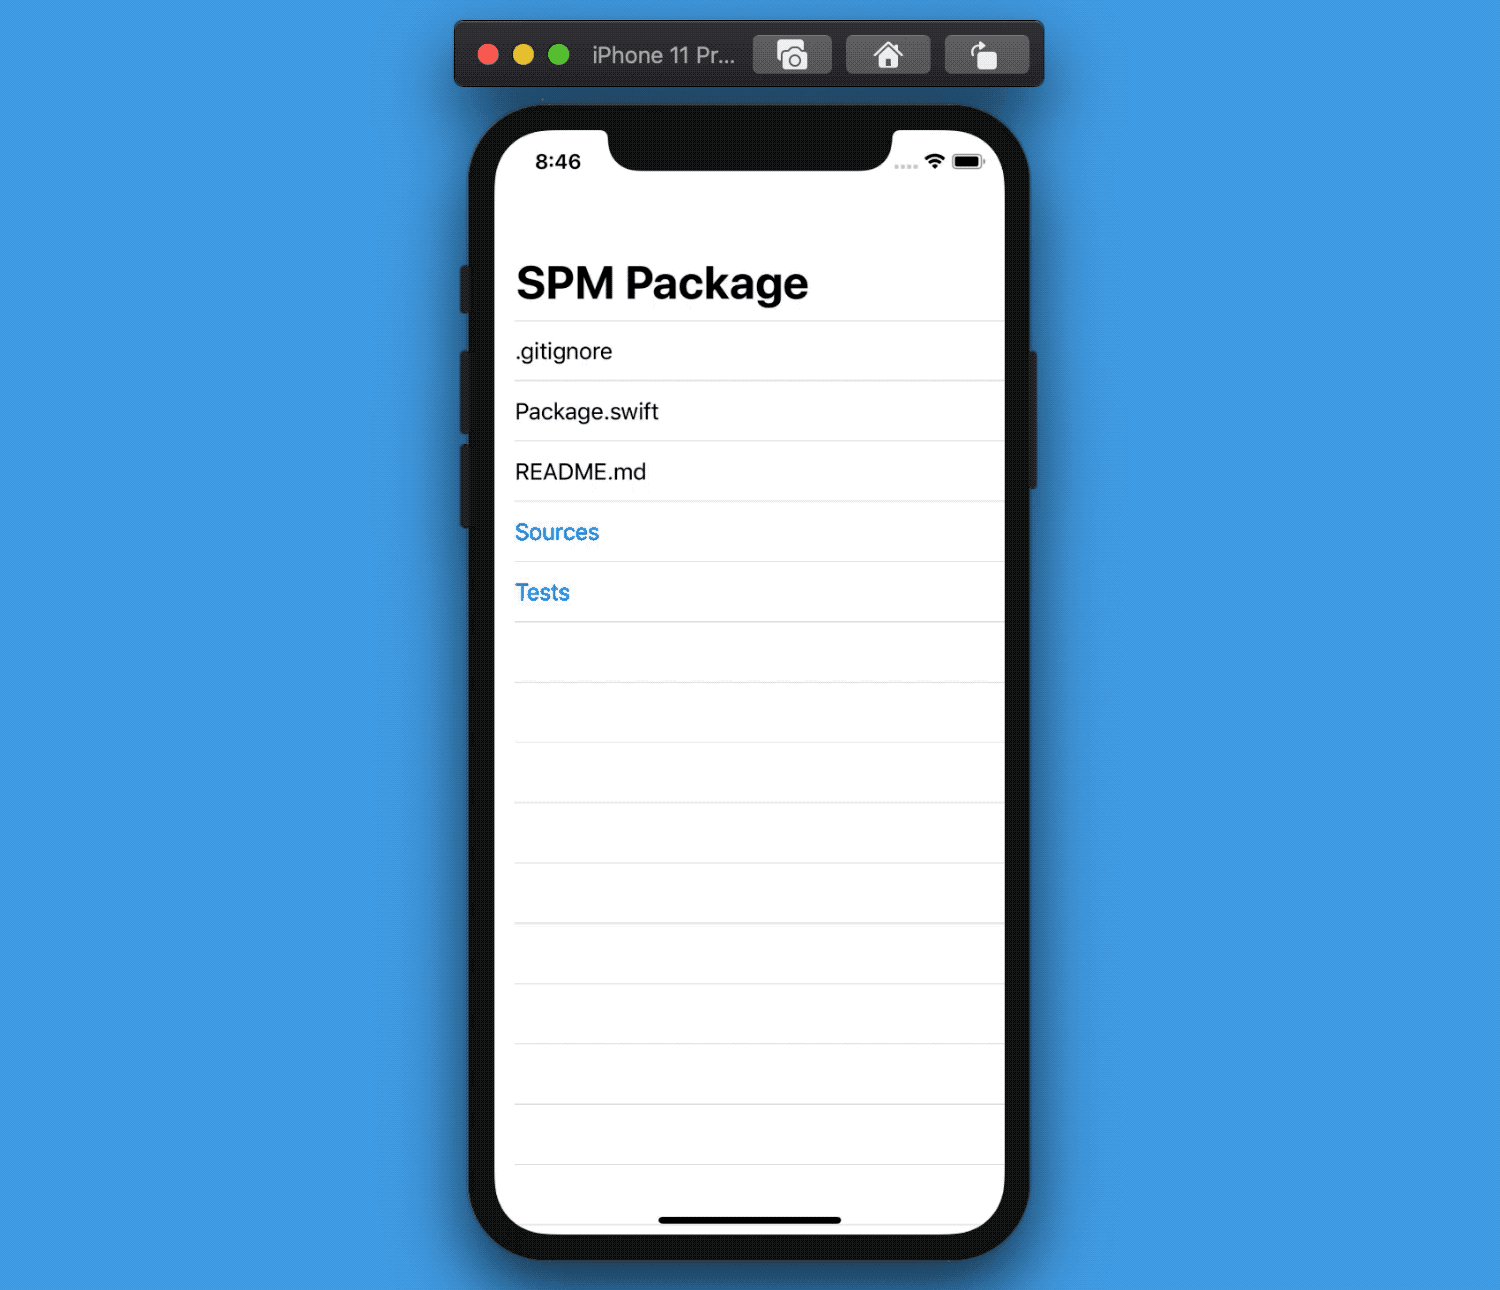
For example, SwiftUI's List initially only displays the first level of the hierarchy, with all disclosure groups collapsed:
how can we have the opposite behavior, where the full hierarchy is displayed from the start?
As we've covered in a How to add optional @Bindings to SwiftUI views, DisclosureGroup comes with multiple initializers, some of which accept an isExpanded binding, letting us control the group expanded/collapsed state.
We can use one of those initializers to wrap the default DisclosureGroup in a new view, FSDisclosureGroup, that will set the initial isExpanded state to true instead of false:
struct FSDisclosureGroup<Label, Content>: View where Label: View, Content: View {
  @State var isExpanded: Bool = true
  @ViewBuilder var content: () -> Content
  @ViewBuilder var label: Label

  var body: some View {
    DisclosureGroup(
      isExpanded: $isExpanded,
      content: content,
      label: label
    )
  }
}
We can now replace DisclosureGroup in our RecursiveView with FSDisclosureGroup and voila', the full hierarchy is displayed by default, and users can still collapse/expand groups later on:
The final gist can be found here.
Hierarchy Lists in iOS 13
Both the new hierarchical List API and DisclosureGroup are iOS 14+. However, we've already built our DisclosureGroup:
without bringing the whole API here, let's replace FSDisclosureGroup with the following:
struct FSDisclosureGroup<Label, Content>: View where Label: View, Content: View {
  @State var isExpanded: Bool = false
  @ViewBuilder var content: () -> Content
  @ViewBuilder var label: Label

  var body: some View {
    Button {
      isExpanded.toggle()
    } label: {
      label.foregroundColor(.blue)
    }

    if isExpanded {
      content()
    }
  }
}
This iOS-13 compatible View makes the whole row tappable, making it simple to see which elements have sub elements or not:
Making the UI more similar to the iOS 14
DisclosureGroupis left as an exercise to the reader.
From the image above, we can see that our list is missing something that DisclosureGroup was taking care of: the padding!
When a group is expanded, its children are displayed with a leading padding to show the data structure clearly. However, we do not get that in our implementation.
Luckily for us, this is simple to address: all we need to do is add a .padding(.leading) modifier in our recursive call of RecursiveView.
private struct RecursiveView<Data, RowContent>: View where Data: RandomAccessCollection, Data.Element: Identifiable, RowContent: View {
  ...

  var body: some View {
    ForEach(data) { child in
      if let subChildren = child[keyPath: children] {
        DisclosureGroup {
          RecursiveView(data: subChildren, children: children, rowContent: rowContent)
            .padding(.leading) // 👈🏻
        } label: {
          ...
        }
      } else {
        ...
      }
    }
  }
}
And that's it! Now we have a complete port of the Hierarchy List to iOS 13 😃
The complete gist, compatible with Xcode 11 and Swift 5.2, can be found here.
Conclusions
This week we've explored and re-implemented another great SwiftUI addition: are you going to use it in your projects?
What other new SwiftUI feature would you like me to write about? Please let me know!
Thank you for reading, and stay tuned for more SwiftUI articles!