The Ultimate Guide To Swift Executables 🚀
 @zntfdr
Every macOS/iOS developer uses tools such as fastlane and SwiftLint to automate tasks as much as possible:
in this article we're going to dive into how we can build our own tools using Swift.
Why Swift?
There are multiple advantages of using Swift: - we know the language - building a script is similar to building an app or a library - everybody in the team can read, understand, and edit what any script does
In fact, everything is so familiar that we're going to build a script with the Swift Package Manager!
Creating An Executable
Creating a new package in Xcode defaults into library. Instead, we're going to use the command line to create an executable, please open your favorite terminal and fire the following commands:
$ mkdir hello
$ cd hello
$ swift package init --type executable
Once the last command completes, a bunch of new files have been created, and our new executable is ready to run! Let's take a look at what we have first.
The Package Structure
Before diving into the package structure, it is important to know what a Package Target is.
Package Target(s)
A Package Target is a basic building block of any Swift Package, you can think of a target as a module or a library, its representation is a folder:
all files within that folder belongs to that specific target, and every file can access to all other declarations within that folder.
A Target can depend on other targets, said targets can be within the same package or come from external packages, we will cover both cases in this article.
There are two kinds of targets: those that are compiled into a module, and those that are compiled into a test suite (more on this soon).
The Structure
When we run $ swift package init --type executable, the basic structure of our package is automatically generated:
├── Package.swift
├── README.md
├── Sources
│   └── hello
│       └── main.swift
└── Tests
    ├── helloTests
    │   ├── helloTests.swift
    │   └── XCTestManifests.swift
    └── LinuxMain.swift
This structure is very similar to a library package:
- The
Testsfolder is where our tests are, we will have a folder for each test target. - The
Sourcesfolder is where our script code will live, we will have one folder for each module target. The compiler distinguishes executable modules from library modules thanks to the presence, or absence, of amain.swiftfile in the target folder. - The
README.mdis for us to describe the purpose of the package. - Lastly, we have the most important file: the
Package.swiftmanifest, we will look at this next.
From the file structure above we can see that we have two targets:
- a helloTests test target. - a hello module target, which we now know is an executable module, as it contains a main.swift file.
While this is all clear to us now, nothing really works until it's declared in the Package.swift manifest file.
The Package Manifest
Package.swift is the entry point of every package, it showcases all there is to know about it:
// swift-tools-version:5.1

import PackageDescription

let package = Package(
    name: "hello",
    dependencies: [
    ],
    targets: [
        .target(
            name: "hello",
            dependencies: []),
        .testTarget(
            name: "helloTests",
            dependencies: ["hello"]),
    ]
)
The generated
Package.swiftfile.
We can double-click on this file to open the whole package in Xcode.
The first line always declares the Swift tools version, which lets the compiler know the minimum version of the Swift tools (such as the PackageDescription module) and Swift language (compatibility) version to use in order to process the manifest file.
Without this line, the compiler can't know if a package has been written in Swift 3, 6 or else:
therefore this line is required, and we wouldn't be able to compile the package without it.
We then import the PackageDescription module, which defines all the APIs available for us to use when declaring a Package.
Lastly, we have our package definition, in here we find:
- The package name which defaults to the folder name where we ran the
$ swift package initcommand. - The package external dependencies there are none at the moment.
- The package targets the generated package has two targets, a module target,
.target, and a test target,.testTarget.
If not specified otherwise, the folder of each target has the same name as the target, and all .target declarations are to be found in the Source folder, while the .testTarget targets are to be found in the Tests folder.
Note how each target can have its own dependencies, these dependencies can come from within the package itself, like in our .testTarget case, or from external packages (we will see how to do so later on in this article).
Now that we understand the package structure and its declaration, it's time to look at the content of hello target folder: the main.swift file.
main.swift
print("Hello, world!")
That's it! The whole body is one print statement ready to be run, let's do so!
Build, Run, And Test A Package
$ swift build
$ swift run
$ swift test
Building A Package
swift build will resolve, download, and compile any dependency mentioned in the package manifest file, it will then build the specified target dependencies (if any) and finally the target itself.
Since our package only has one target, it is inferred, and we can omit its name in the command.
The complete command would be $ swift build --target hello.
Running A Package
As for the build phase, since we only have one target, we can omit its name, however the complete command is $ swift run hello.
With this, we should see the following in the terminal:
$ swift run
> Hello, world!
Congratulations on running your first executable!
We don't have to build every time before running:
$ swift runwill automatically build the target when necessary.
Testing A Package
We can run all the package tests via $ swift test.
It's best to always run all the tests. If we'd like to run only a subset, the swift test command offers a --filter flag that does exactly that.
For example, we can run all the tests in helloTests with $ swift test --filter helloTests.
Common Patterns
There are a few very common use cases in the scripting world, let's cover them!
Exit Codes & System Modules
All scripts have an exit status (or code) when complete, the most common are 0 for success and 1 for failure. While those are the de facto standards, I prefer to avoid writing magic numbers in code:
this is why you'll see me importing the Darwin module in some examples below: Darwin defines the two values for a successful exit, EXIT_SUCCESS, and unsuccessful exit, EXIT_FAILURE.
Darwin is Apple’s UNIX-based core of every Apple OS, I like to think of it as the foundation of the
Foundationframework (FoundationimportsDarwin) but really Darwin is much more than that.
Here's a silly example, please replace the main.swift content with the following:
import Darwin

// Flip a coin.
if Bool.random() {
  exit(EXIT_SUCCESS) // exit(0)
} else {
  exit(EXIT_FAILURE) // exit(1)
}
While this script does absolutely nothing, it will exit with success only 50% of the time.
Hide this script in your company project build phases to see your colleagues lose their minds 😆
This script showcases another important aspect of Swift Packages: we do not need to declare system dependencies.
All system modules (such as Foundation and Darwin) can be freely imported in our scripts without having to add such dependency in our Package.swift manifest.
Lastly, if the script ends because it completes its execution, it automatically ends with a success state: we don't need to call exit(EXIT_SUCCESS) at the bottom of every script.
Launch Arguments
Most scripts need some input before running, for example a path to a folder, a meaningful value, etc.
This kind of input can be read via the CommandLine object, which holds the parameters passed to the script at launch.
To test it out, please replace the current main.swift content with the following:
import Darwin

// We drop the first argument, which is the script execution path.
let arguments: [String] = Array(CommandLine.arguments.dropFirst())

guard let name: String = arguments.first else {
  exit(EXIT_FAILURE)
}

print("Hello \(name)")
And here's how you can run:
$ swift run hello Swift
> Hello Swift
$ swift run hello Federico
> Hello Federico
The first argument of CommandLine.arguments is always the script execution path, while the following arguments are the user inputs, for example:
$ swift run hello 1 2 3
Results in a CommandLine.arguments String array of four elements:
["<execution-path-here>", "1", "2", "3"]
Interactive Scripts
Sometimes scripts need more user input after launch, for such cases we can use readLine():
import Darwin

print("What`s your name?")

guard let name = readLine(), !name.isEmpty else {
  exit(EXIT_FAILURE)
}

print("Hello \(name)")
readLine() is a synchronous call that waits for the user to type something (until the return key is pressed) before proceeding, here's how you can run it:
$ swift run hello
> What`s your name?
> Federico
> Hello Federico
The third line,
Federico, is something that we type in the console.
Environment Variables
A fundamental aspect of many automation/CI tools is having access to the inherited shell environment, in Swift this couldn't be easier:
import Foundation

let environment: [String: String] = ProcessInfo.processInfo.environment

if let secret = environment["MYSECRET"] {
  print(secret)
}
ProcessInfois part ofFoundation.
$ MYSECRET=FiVeStArStOkEn swift run hello
> FiVeStArStOkEn
Pipeline Messages
One of the most powerful features of scripts is the concept of pipeline messages: this concept lets us chain multiple scripts, where a script input is the output of the previous script.
In order to support that, we can use Foundation's FileHandle:
import Foundation

let standardInput: FileHandle = .standardInput

if let input = String(data: standardInput.availableData, encoding: .utf8) {
  print(input)
}
This script expects data at launch: if there's no data, it's going to wait until some is given.
FileHandle manages data associated with files, sockets, pipes, and devices:
in our case we use it to read the available data from the standardInput terminal.
Here's an example where we use our new script in a pipeline with the list command ls:
$ ls -1 | swift run hello
> Package.swift
> README.md
> Sources
> Tests
In this case our script reads the pipeline input and prints it out.This is a similar behavior to the concatenate command
cat.
Similarly, here's how we'd use it for our script to pass data to the next script in the pipeline:
import Foundation

let standardOutput: FileHandle = .standardOutput

if let outputData = "Five stars".data(using: .utf8) {
  standardOutput.write(outputData)
}
In this example we take our script output and pass it to cat:
$ swift run | cat
> Five stars
catreads the pipeline input and prints it out.
Asynchronous Calls
In our apps it's completely fine and even encouraged to do work asynchronously: when we pass a block to a DispatchQueue, we know that our block will run at some point in the future.
In the executables world, our scripts life ends as soon as we reach the end of the main.swift file:
if we dispatch something, it's likely that our script ends before the dispatched block had a chance to execute.
Does it mean that we cannot do any asynchronous work in our scripts? Absolutely not.
There are multiple ways to achieve this, I suggest using either RunLoop.current.run() or dispatchMain(), both of them do a similar thing: - the former puts the script loop on hold and waits for input data to process. - the latter starts a loop on the main queue which waits for blocks to execute.
What matters is that both stop the script from terminating, this way: - we can do as much (asynchronous) work as we like - once the work is complete, we must send an exit signal to terminate our execution
As an example, here's how we can make an asynchronous fetch request:
import Foundation

let url = URL(string: "https://api.github.com/users/zntfdr")!
let request = URLRequest(url: url)
URLSession.shared.dataTask(with: request) { data, _, error in
  if let data = data {
    let responseText = String(data: data, encoding: .utf8)!
    print(responseText)
    exit(EXIT_SUCCESS)
  } else {
    print(error!.localizedDescription)
    exit(EXIT_FAILURE)
  }
}.resume()

RunLoop.current.run() // or dispatchMain()
Replace the
main.swiftcontent with this to try it out!
Common Patterns Standards
Certain patterns are repeated across many scripts:
wouldn't it be great if there was a common standard for all the scripts to conform to?
The incredible team behind the Swift Package Manager has released two packages that do just that:
please welcome ArgumentParser and swift-tools-support-core.
More specifically, we're going to use the SwiftToolsSupport product of the latter, which consists of two libraries: TSCUtility and TSCBasic (TSC = Tools Support Core).
This package was previously part of the original
swift-package-managerpackage, and these two libraries were previously known asSPMUtilityandBasic.
As we will see shortly, these two modules offer powerful abstractions for common operations.
Even if these packages are released and maintained by people at Apple, they're not system modules, therefore we need to add them as a dependency to our own package, let's see how to do so!
Adding a Package Dependency
We've seen that Package.swift lists the package dependencies, let's add our new one there:
let package = Package(
    ...
    dependencies: [
        .package(url: "https://github.com/apple/swift-tools-support-core.git",
                 from: "0.0.1"),
        .package(url: "https://github.com/apple/swift-argument-parser",
                 from: "0.0.1"),
    ],
    targets: [
        ...
    ]
)
If you'd like to find out the latest official version of any package, use the following link:
https://github.com/AUTHOR/PACKAGE/releases/latest, for examplehttps://github.com/apple/swift-tools-support-core/releases/latest.
Our package now depends on both ArgumentParser and swift-tools-support-core, next we need to declare which targets want to use a product of these packages, to do so, please update the hello target dependencies as seen below:
let package = Package(
    ...
    dependencies: [
        ...
    ],
    targets: [
        .target(
            name: "hello",
            dependencies: ["ArgumentParser", "SwiftToolsSupport"]),
        .testTarget(...),
    ]
)
Our hello target can now use the libraries offered by both ArgumentParser and SwiftToolsSupport, let's try them out!
Parse Input Arguments
This section has been rewritten to use the new Argument Parser, If you'd like to see how we got there, please see my deep dive into
TSCUtility'sArgumentParserhere.
The
ArgumentParserlibrary has an incredible documentation section, in this article I'm going to make a small example: make sure to bookmark the official documentation for many more examples and insights into the library.
If you'd like to know more about the inner workings of the
ArgumentParserpackage, please see this deep dive.
We've already seen how we can read launch arguments via the CommandLine, so why would we need to use ArgumentParser for this? Let me give you a few reasons:
- Previously we were manually reading an array of strings and then parse/convert them to something meaningful: this is equivalent of fetching a JSON object and then manually parse its contents instead of using
JSONDecoder.
- Scripts might be launched with more than just raw values: we might expect a combination of flags (for example
ls -la,ls -l -a,ls -al,ls -a -lare all valid commands and do the same thing), or a mix of flags and values.
- Good scripts offer auto completion for their arguments.
- Good scripts also come with documentation: wouldn't it be great if all our scripts follow the same pattern?
...and this is why we use ArgumentParser, which ticks all the boxes (beside autocompletion, for now), and more.
In this example we will require a flag --name with an associated value: after implementing it, the scripts will expect to be launched with something like $ swift run hello --name YourName:
- ArgumentParser requires us to define a type conforming to
ParsableCommand:`swift struct Hello: ParableCommand { }`
- Then we declare one or more expected arguments via one of the four
ArgumentParser's' property wrappers:`swift struct Hello: ParableCommand { @Option(help: "Specify your name.") var name: String }`
- To complete the definition, we need to add our custom logic in the
ParsableCommand'srun()method:
struct Hello: ParsableCommand {
  // Declare expected launch argument(s).
  @Option(help: "Specify your name.")
  var name: String

  // Our custom logic goes here.
  func run() throws {
    print("Hello \(name)")
  }
}
run()executes only when all the declared launch arguments have been assigned. If an argument has a mistmatch or is missing, the script will rise and error and our logic won't run.
We then can trigger Swift to both do the parsing and execute our logic via a static ParsableCommand function:
Hello.main()
Here's the complete code:
import ArgumentParser

// Define our parser.
struct Hello: ParsableCommand {
  // Declare expected launch argument(s).
  @Option(help: "Specify your name.")
  var name: String

  func run() throws {
    print("Hello \(name)")
  }
}

// Run the parser.
Hello.main()
Replace the
main.swiftcontent with this to try it out!
And here are a few examples of the script in action:
$ swift run hello --name Federico
> Hello Federico

$ swift run hello Federico
> Error: Unexpected argument 'Federico'
> Usage: hello --name <name>

$ swift run hello --name
> Error: Missing value for '--name <name>'
> Usage: hello --name <name>

$ swift run hello --help
> USAGE: hello --name <name>
>
> OPTIONS:
>   --name <name>           Specify your name.
>   -h, --help              Show help information.
This is how the
swiftcommand line tool works as well: if you run$ swift --help, or$ swift run --help, etc you will see exactly the same format as our new script.
Progress State
In our apps we never want to block the UI while we're doing some work.
In scripts this is not always the case, because we might need to finish the current work before the user can continue its flow.
While this is completely fine and acceptable, leaving the terminal frozen while we're doing so is not the best user experience: the user might think that the script is stuck.
To address this issue, we can use one of the progress animations that TSCUtility gives us, here's an example:
Adding an animation is pretty straight forward:
- First we initialize the animation itself, in this case we're using
PercentProgressAnimation:`swift let animation = PercentProgressAnimation( stream: stdoutStream, header: "Loading Awesome Stuff ✨" )`
- Then we need to let the animation know when to update:
`swift animation.update(step: i, total: 100, text: "Loading..")` > Note how we don't need to worry about the presentation at all: we only pass the current step, the number ot total steps, and thenTSCUtilitywill take care of the rest for us.
- Lastly, we call animation complete when the work is done:
`swift animation.complete(success: true)`
And this is the final code:
import Darwin
import TSCBasic
import TSCUtility

let animation = PercentProgressAnimation(
  stream: stdoutStream,
  header: "Loading Awesome Stuff ✨")

for i in 0..<100 {
  let second: Double = 1_000_000
  usleep(UInt32(second * 0.05))
  animation.update(step: i, total: 100, text: "Loading..")
}

animation.complete(success: true)
print("Done! 🚀")
Replace the
main.swiftcontent with this to try it out!
Colors
The progress state that we just talked about had something new that we haven't touched before: colors! Let's see how we can add colors to our scripts.
- First of all, we need to create a
TerminalController, this object helps us control a terminal: for example it allows operations such as cursor movement and colored text output:`swift let terminalController = TerminalController(stream: stdoutStream)`
- Then we must choose which
TerminalController.Colorvariation we would like to use, as of the current release, these are the options:noColor,red,green,yellow,cyan,white,black, andgrey.
- Lastly, we print our message in the command line:
`swift terminalController?.write("Hello World", inColor: .yellow, bold: true)`
- With the
TerminalControllerwe have more control over a simpleprintcommand, therefore the commandwritealone doesn't end the line: we must end the line ourselves by callingendLine().`swift terminalController?.endLine()`
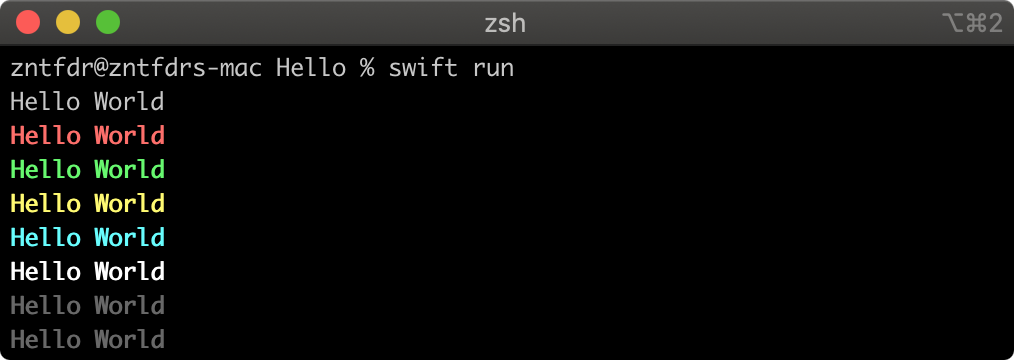
Here's the example:
import TSCBasic

let terminalController = TerminalController(stream: stdoutStream)

let colors: [TerminalController.Color] = [
  .noColor, .red, .green, .yellow, .cyan, .white, .black, .grey
]

for color in colors {
  terminalController?.write("Hello World", inColor: color, bold: true)
  terminalController?.endLine()
}
Replace the
main.swiftcontent with this to try it out!
Releasing A Script
We now have everything we need to build a great script. There's a final step that we must take in order to complete our journey: ship it!
So far we've ran the script by using $ swift run hello, but this works only if we are in the hello/ folder: how can we run our script from anywhere?
Two steps:
- Generate our script binary in release mode.
`shell $ swift build --configuration release` Until now we've used the defaultdebugbuild strategy when building our script, this works great while developing it, however it's no longer necessary when we want to release it. This configuration flag will create a new executable in the.build/release/folder.
- Copy the new binary to the user binary folder.
`shell $ cp .build/release/hello /usr/local/bin/hello`/usr/local/bin/is a folder know as user binary folder which contains plenty of executable binaries: anything placed there can be launched from the terminal by using its name, which means that we can now run our script with:`shell $ hello`
Here are the two command lines for easy copy-pasting:
$ swift build -c release
$ cp .build/release/hello /usr/local/bin/hello
That's it! We can now run our script from anywhere!
Conclusions
In this article we've started from exploring how a Swift Executable is structured, how we can read its contents from the package manifest file, and then we've moved into common script patterns and how we can use Apple's swift-tools-support-core in order to achieve high quality scripts without having to do all the work ourselves.
I hope this reference guide helps you kick-start your Swift scripting journey, and I would love to know what scripts you're going to build! Please let me know on Twitter!
Thank you for reading and stay tuned for more articles! 🚀