Backport SwiftUI safe area insets to iOS 13 and 14
 @zntfdr
safeAreaInset() is an iOS 15+ SwiftUI view modifier, empowering us to define views that become part of the observed safe area. We've extensively covered this view modifier in a previous article: in this article, let's explore how we can use it in older iOS versions.
Scroll views
safeAreaInset() affects the proposed region of the views it's applied to, it shines when applied to scroll views (see the previous article for a deeper look):
 |  |
The button is defined in an overlay() | The button is defined in a safeAreaInset() |
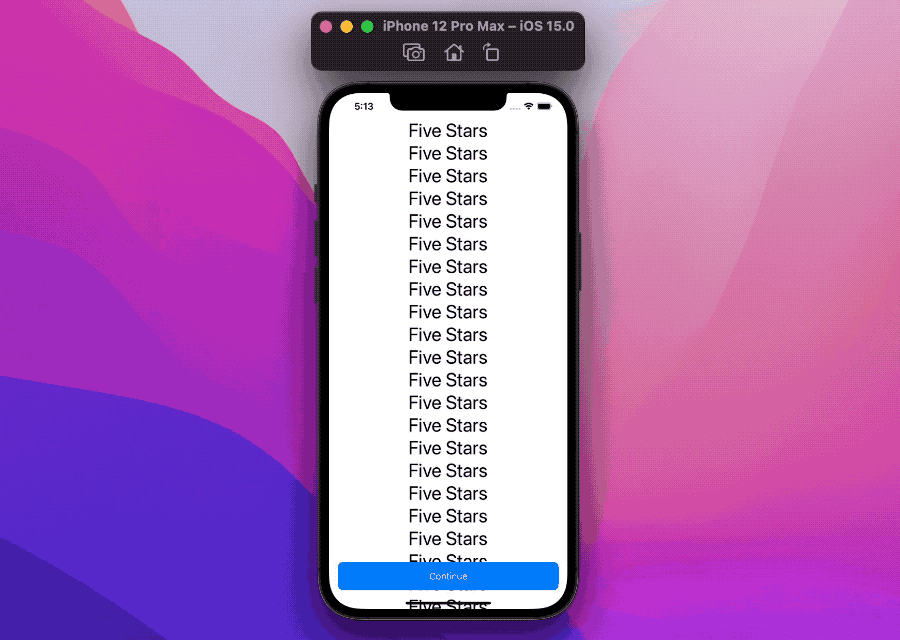
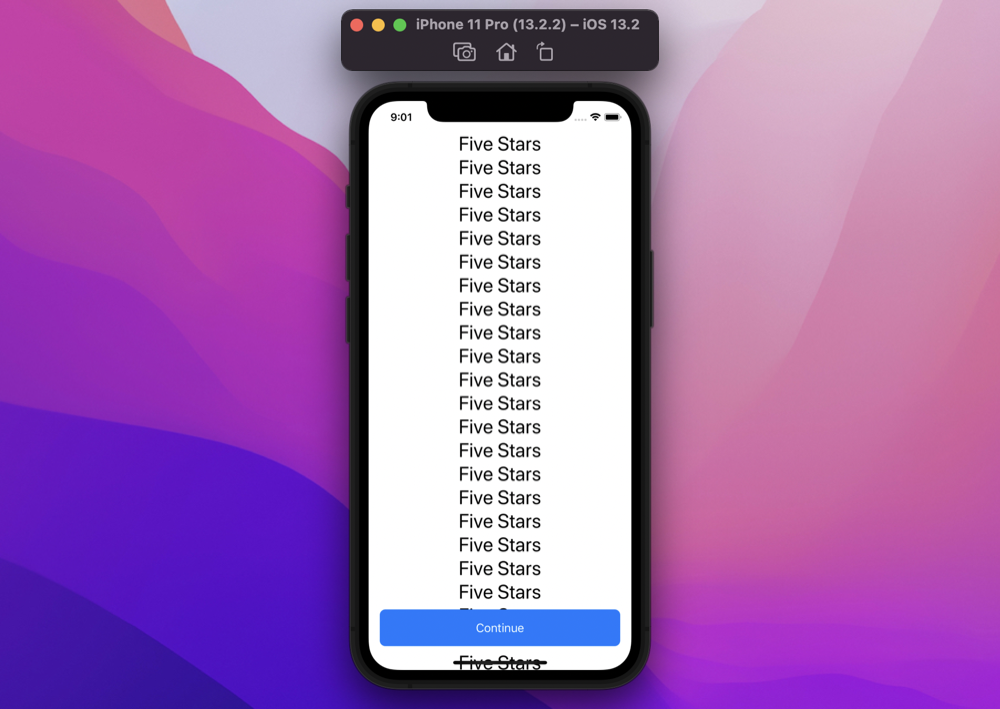
When the button is placed as an overlay, it doesn't effect the ScrollView content, meaning that the button will cover the last ScrollView elements.
ScrollView comes with two frames (more details here):
- the frame layer, used to position the
ScrollViewitself in the view hierarchy - the content layer, where all the
ScrollViewcontent is placed
When an edge of the ScrollView frame layer is adjacent to the equivalent safe area edge, the content layer will be displayed beyond the frame layer.
This is why, in the images above, we can see some of the content underneath the iPhone's Home Indicator, or in the top safe area, touching the notch.
safeAreaInset() + ScrollView is too good to having to wait until we only support iOS 15+ before start using it, let's see how we can backport it to any iOS compatible with SwiftUI.
Overlay
For simplicity's sake, we will focus on the bottom edge: the same approach works for any other edges.
Since safeAreaInset() is off-limits, we will use an overlay for our "safe area" content:
struct ContentView: View {
  var body: some View {
    ScrollView {
      ForEach(1..<60) { _ in
        Text("Five Stars")
          .font(.title)
          .frame(maxWidth: .infinity)
      }
    }
    .overlay(
      Button {
        // ...
      } label: {
        Text("Continue")
          .foregroundColor(.white)
          .padding()
          .frame(maxWidth: .infinity)
          .background(Color.accentColor.cornerRadius(8))
          .padding(.horizontal)
      },
      alignment: .bottom
    )
  }
}
Both our ScrollView and overlay content don't really matter, let's refactor them out:
struct ContentView: View {
  var body: some View {
    ScrollView {
      scrollViewContent
    }
    .overlay(
      overlayContent,
      alignment: .bottom
    )
  }

  var scrollViewContent: some View {
    ForEach(1..<60) { _ in
      Text("Five Stars")
        .font(.title)
        .frame(maxWidth: .infinity)
    }
  }

  var overlayContent: some View {
    Button {
      // ...
    } label: {
      Text("Continue")
        .foregroundColor(.white)
        .padding()
        .frame(maxWidth: .infinity)
        .background(Color.accentColor.cornerRadius(8))
        .padding(.horizontal)
    }
  }
}
Great! The first challenge is computing how much extra inset our overlay adds to our ScrollView. Let's tackle this next.
Computing the extra inset
Our overlay's extra inset is equivalent the height of our overlayContent.
In this website we've used multiple times readSize(:), a View extension we defined here, letting us read the size of any given view. Here's an adaptation of the same extension, surfacing just the height of the view we're targeting:
extension View {
  func readHeight(onChange: @escaping (CGFloat) -> Void) -> some View {
    background(
      GeometryReader { geometryProxy in
        Spacer()
          .preference(
            key: HeightPreferenceKey.self,
            value: geometryProxy.size.height
          )
      }
    )
    .onPreferenceChange(HeightPreferenceKey.self, perform: onChange)
  }
}

private struct HeightPreferenceKey: PreferenceKey {
  static var defaultValue: CGFloat = .zero
  static func reduce(value: inout CGFloat, nextValue: () -> CGFloat) {}
}
We can now read the "extra inset" and store it in a @State variable, for example overlayContentHeight:
struct ContentView: View {
  @State var overlayContentHeight: CGFloat = 0

  var body: some View {
    ScrollView {
      scrollViewContent
    }
    .overlay(
      overlayContent
        .readHeight {
          overlayContentHeight = $0
        }
      ,
      alignment: .bottom
    )
  }

  var scrollViewContent: some View { ... }
  var overlayContent: some View { ... }
}
We now know by how much our ScrollView needs to scroll past the last scrollViewContent element.
Spacer
Spacer is mostly used to distribute views within stacks. However, in our challenge, we will use it to add that extra scroll necessary in our ScrollView:
struct ContentView: View {
  @State var overlayContentHeight: CGFloat = 0

  var body: some View {
    ScrollView {
      scrollViewContent
      Spacer(minLength: overlayContentHeight)
    }
    .overlay( ... )
  }

  var scrollViewContent: some View { ... }
  var overlayContent: some View { ... }
}
Vertical Spacers usually don't take space in vertical ScrollViews: we can enforce them by using their minLenght parameter.
We've now created our own bottom safe view area inset, compatible with any iOS version!
A new challenge
Our solution works great; however, it's not portable, as there's quite a bit of implementation logic. So let's see what we can do about it.
View extension
We could create our own view modifier, mocking safeAreaInset:
extension View {
  func bottomSafeAreaInset<OverlayContent: View>(_ overlayContent: OverlayContent) -> some View {
    modifier(BottomInsetViewModifier(overlayContent: overlayContent))
  }
}

struct BottomInsetViewModifier<OverlayContent: View>: ViewModifier {
  var overlayContent: OverlayContent
  @State var overlayContentHeight: CGFloat = 0

  func body(content: Self.Content) -> some View {
    content
      .overlay(
        overlayContent
          .readHeight {
            overlayContentHeight = $0
          }
        ,
        alignment: .bottom
      )
  }
}
Which we can use as following:
struct ContentView: View {
  var body: some View {
    ScrollView {
      scrollViewContent
    }
    .bottomSafeAreaInset(overlayContent)
  }

  var scrollViewContent: some View { ... }
  var overlayContent: some View { ... }
}
Nobody is now reading our overlayContentHeight, let's solve that by creating a new bottomSafeAreaInset environment value:
struct BottomSafeAreaInsetKey: EnvironmentKey {
  static var defaultValue: CGFloat = 0
}

extension EnvironmentValues {
  var bottomSafeAreaInset: CGFloat {
    get { self[BottomSafeAreaInsetKey.self] }
    set { self[BottomSafeAreaInsetKey.self] = newValue }
  }
}
Then we can make our new view modifier inject its overlayContentHeight value into the environment:
struct BottomInsetViewModifier<OverlayContent: View>: ViewModifier {
  var overlayContent: OverlayContent
  @State var overlayContentHeight: CGFloat = 0

  func body(content: Self.Content) -> some View {
    content
      .environment(\.bottomSafeAreaInset, overlayContentHeight) // 👈🏻
      .overlay( ... )
  }
}
Since our view modifier injects bottomSafeAreaInset into its content, we can now read this value in the scroll view. Let's take advantage of that.
ScrollView
ScrollView doesn't listen to our bottomSafeAreaInset environment value by default, at this point we probably have two possibilities:
- wrap
ScrollViewinto a new view that listens and injects aSpacerwith the relevant height - create a new view for our
Spacer, and add it into theScrollView
This is a matter of taste, let's use the second option here.
First, we define our new view:
struct ExtraBottomSafeAreaInset: View {
  @Environment(\.bottomSafeAreaInset) var bottomSafeAreaInset: CGFloat

  var body: some View {
    Spacer(minLength: bottomSafeAreaInset)
  }
}
All this view does is read the bottomSafeAreaInset environment and use it as its Spacer minLength parameter.
Second, we use this view in our ScrollView content:
struct ContentView: View {
  var body: some View {
    ScrollView {
      scrollViewContent
      ExtraBottomSafeAreaInset() // 👈🏻
    }
    .bottomSafeAreaInset( ... )
  }

  var scrollViewContent: some View { ... }
  var overlayContent: some View { ... }
}
Now we can easily port this "safe area inset" in as many ScrollViews as we like!
Cumulative view modifiers
The original safeAreaInset() view modifier was cumulative: we could apply multiple view modifiers to the same view, and the correct safe area would have been applied to the final view.
For our view modifier to behave the same way, we need to adjust our BottomInsetViewModifier implementation in two aspects:
- pass down a
bottomSafeAreaInsetvalue as the sum of its content height and the ancestors'bottomSafeAreaInset - shift its
contentby its ancestors'bottomSafeAreaInset
struct BottomInsetViewModifier<OverlayContent: View>: ViewModifier {
  @Environment(\.bottomSafeAreaInset) var ancestorBottomSafeAreaInset: CGFloat
  var overlayContent: OverlayContent
  @State var overlayContentHeight: CGFloat = 0

  func body(content: Self.Content) -> some View {
    content
      .environment(\.bottomSafeAreaInset, overlayContentHeight + ancestorBottomSafeAreaInset) // 👈🏻 1
      .overlay(
        overlayContent
          .readHeight {
            overlayContentHeight = $0
          }
          .padding(.bottom, ancestorBottomSafeAreaInset) // 👈🏻 2
        ,
        alignment: .bottom
      )
  }
}
With this extra change, we can now apply as many bottomSafeAreaInset as needed, and they all will work as expected:
struct ContentView: View {
  var body: some View {
    ScrollView {
      scrollViewContent.border(Color.red)
      ExtraBottomSafeAreaInset()
    }
    .bottomSafeAreaInset(overlayContent)
    .bottomSafeAreaInset(overlayContent)
    .bottomSafeAreaInset(overlayContent)
    .bottomSafeAreaInset(overlayContent)
    .bottomSafeAreaInset(overlayContent)
  }

  var scrollViewContent: some View { ... }
  var overlayContent: some View { ... }
}
iOS 15
Lastly, we want to make it easy to move to SwiftUI's safeAreaInset once we drop support for older iOS versions, we can do so by:
- using
safeAreaInsetfor iOS 15+, this guarantees that if, in the future, anything changes onsafeAreaInsetbehavior, we will see it reflected in our apps - adding an
@availabledeclaration to our view modifier definition, as soon as we drop iOS 14 support, this will trigger a warning telling us to adopt the officialsafeAreaInsetAPIs:
@available(iOS, introduced: 13, deprecated: 15, message: "Use .safeAreaInset() directly") // 👈🏻 2
extension View {
  @ViewBuilder
  func bottomSafeAreaInset<OverlayContent: View>(_ overlayContent: OverlayContent) -> some View {
    if #available(iOS 15.0, *) {
      self.safeAreaInset(edge: .bottom, spacing: 0, content: { overlayContent }) // 👈🏻 1
    } else {
      self.modifier(BottomInsetViewModifier(overlayContent: overlayContent))
    }
  }
}
The same
@availableattribute should be applied to all other definitions as well.
The final gist can be found here.
Conclusions
WWDC feels like Christmas every year however, in reality, it's a rare privilege to be able to start using the latest/newest API right away.
This shouldn't discourage us and, instead, we should look at it as a great opportunity to challenge ourselves, try backporting some of those APIs, and maybe learn a thing or two along the way.
What new APIs are you most excited about? Let me know via on Twitter or email. Thank you for reading!